
How to Install the TikTok Pixel: A Step-by-Step Walkthrough
In today’s digital marketing landscape, TikTok has emerged as a powerful platform for businesses to connect with their target audience. With over 1.6 billion users, TikTok offers an unparalleled opportunity to boost brand visibility and drive conversions. One of the key tools that can help you maximize your TikTok advertising efforts is the TikTok Pixel. This small piece of code, when installed on your website, allows you to track user actions, measure ad performance, and optimize your campaigns for better results.
If you're new to TikTok Pixel or looking to install it on your site, this guide will walk you through the process in detail.
What Is a TikTok Pixel?
A TikTok Pixel is a tracking tool that captures user interactions on your website and sends this data back to TikTok. It helps you understand how users engage with your ads and which actions lead to conversions. By using the TikTok Pixel, you can:
- Track specific user actions (events) like form submissions, purchases, or cart additions.
- Build custom audiences based on user behavior.
- Optimize ad campaigns for better performance.
- Retarget users who have shown interest in your products or services.
Why Use a TikTok Pixel?
Here are some compelling reasons to use a TikTok Pixel:
- Conversion Tracking: Gain insights into which ads are driving sales or leads.
- Audience Building: Create custom and lookalike audiences to target users who are more likely to convert.
- Ad Optimization: Use real-time data to refine your ad strategies and improve ROI.
- Retargeting: Reach users who have visited your site but haven’t completed a desired action.
Whether you're running a small business or managing a large-scale marketing campaign, the TikTok Pixel is an essential tool for any digital marketer.
Step-by-Step Guide to Installing the TikTok Pixel
Step 1: Log Into TikTok Ads Manager
Start by logging into your TikTok Business Account. If you don't have one, you'll need to create one first. Once logged in, navigate to the Tools section and select Events.
[IMAGE: TikTok Pixel installation walkthrough]
Step 2: Choose Your Website Type
On the Events page, click Get Started. You’ll be prompted to choose whether you want to track events on a website or an app. For this guide, we’ll focus on web.
Step 3: Enter Your Website URL
Next, enter the URL of your website. This ensures that the pixel is properly linked to your domain.
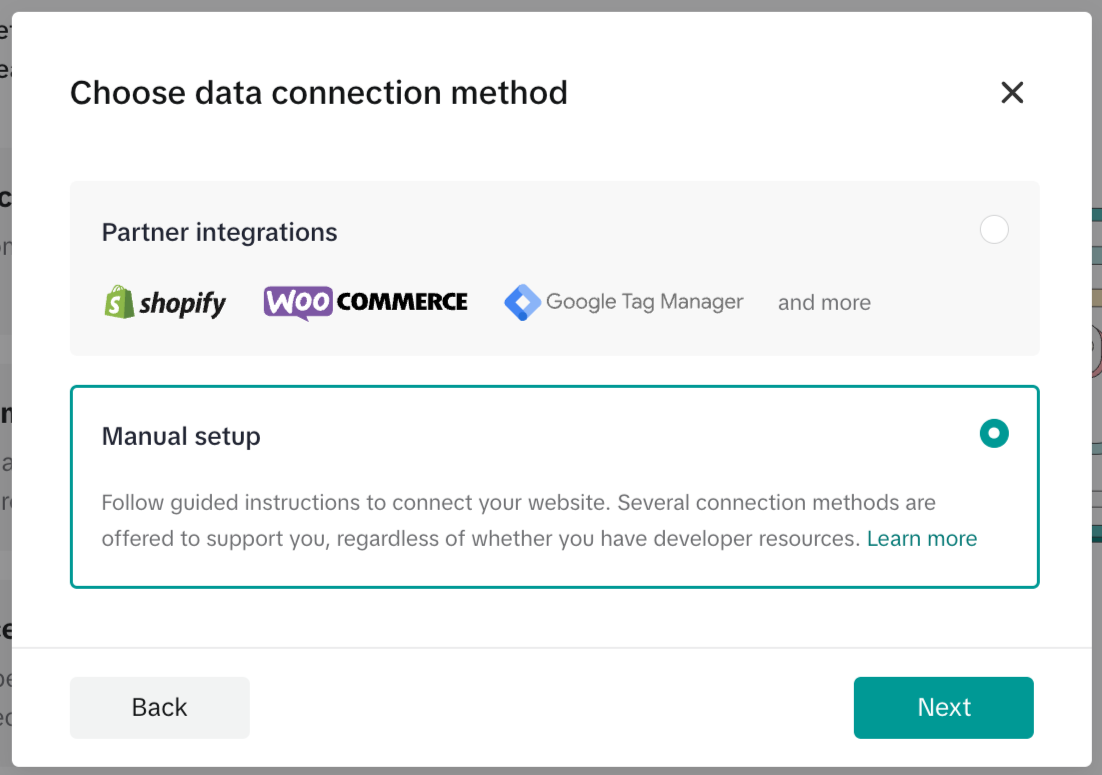
Step 4: Select Your Installation Method
You have two options for installing the TikTok Pixel:
- Manual Setup: Copy and paste the code snippet directly into your website's header.
- Partner Integration: Use platforms like Shopify, WooCommerce, or Google Tag Manager for automated setup.
If you’re using a CMS like WordPress, you can also use plugins such as WPCode to easily add the pixel.
Step 5: Name Your Pixel
Give your pixel a name that reflects your campaign or website. The name should be easy to identify and relevant to your marketing goals.
Step 6: Copy the Pixel Code
Once you’ve created your pixel, copy the provided code snippet. This code will be used to install the pixel on your website.
How to Add the TikTok Pixel to Your Website
After copying the pixel code, follow these steps to add it to your website:
For WordPress Users
- Go to your WordPress dashboard.
- Navigate to Plugins > Add New.
- Search for WPCode and install it.
- Activate the plugin and go to Code Snippets > Header & Footer.
- Paste the TikTok Pixel code into the Header section and save your changes.
For Shopify Users
Shopify offers a partner integration option for easier setup:
- In TikTok Ads Manager, select Partner Integration.
- Choose Shopify from the list of platforms.
- Follow the prompts to connect your Shopify store.
- TikTok will automatically install the pixel for you.
For Other Platforms
If you're using a different platform (like Wix or Webflow), simply locate the header section of your website and paste the pixel code between the <head> and </head> tags.
Verifying Your TikTok Pixel Installation
After installing the pixel, it’s crucial to verify that it’s working correctly. Here’s how you can do it:
- Use the TikTok Pixel Helper: Install this Chrome extension to test your pixel and check for errors.
- Check Event Manager: Go to Ads Manager > Events and review the event data.
- Test Manually: Visit your website and perform actions like adding items to a cart or submitting a form. Check if the events are being tracked.
[IMAGE: TikTok Pixel installation walkthrough]
Common Events Tracked by TikTok Pixel
The TikTok Pixel tracks several standard events, including:
- Add to Cart
- View Content
- Complete Payment
- Search
- Contact
- Subscribe
You can also set up custom events for specific actions that are unique to your business.
Tips for Optimizing Your TikTok Pixel
To get the most out of your TikTok Pixel, consider the following tips:
- Enable Advanced Matching: This improves audience targeting by capturing more user data.
- Track Key Conversions: Focus on events that directly impact your business, such as purchases or sign-ups.
- Use Lookalike Audiences: Target users similar to your existing customers to expand your reach.
- A/B Test Ad Creatives: Experiment with different ad formats to see what resonates best with your audience.
Conclusion
Installing the TikTok Pixel is a straightforward process that can significantly enhance your advertising efforts. By tracking user behavior and optimizing your campaigns, you can achieve better engagement, higher conversion rates, and improved ROI.
Whether you're using WordPress, Shopify, or another platform, the TikTok Pixel is a valuable tool that every marketer should leverage. With the right setup and configuration, you can unlock the full potential of TikTok advertising and grow your business effectively.
[IMAGE: TikTok Pixel installation walkthrough]
Posting Komentar untuk "How to Install the TikTok Pixel: A Step-by-Step Walkthrough"
Posting Komentar